This Galaxy Ain't Big Enough... is the final Fallout 3 main quest and achievement in the Mothership Zeta add-on.
Quick walkthrough
| Main Quest: This Galaxy Ain't Big Enough... | |||||
| Activate the Engine Core teleporter. | |||||
| Fight your way to the Death Ray control. | |||||
| Expose the power units. | |||||
| Overload all four power units. | |||||
| Fight your way to the Bridge teleporter and use it. | |||||
| Kill the Captain. | |||||
| Defeat the opposing Alien ship. | |||||
| Reward: 600 XP Captain's sidearm | |||||
Detailed walkthrough
Reunite with the others
Exit the space walk in an airlock on the observation deck. Activate the switch to repressurize the airlock; you can now remove your spacesuit. In the next room is a teleporter back to the Observation Deck; activating this allows Sally and any surviving abductees to join you. Sally then crawls through a duct to power down the energy gate leading to the next part of the level.
Disable the Death Ray and make your way to the Bridge
After the door is open, head down the hallway into the room with the glass floor. Enjoy the view of Earth. After a short dialog, Sally will go to open another door. Immediately afterwards, a hologram of an alien will appear over the glass floor, and you will learn about the Death Ray. Once Sally returns, proceed through the newly opened door. You will find a deactivated teleporter and be tasked with finding the other end and turning it on.
Upon entering the weapons lab, you will face aliens, turrets, and robots (make sure you obtain the Xenotech Expert perk before leaving). After defeating them, turn left and go down the hallway on the far side. In a room to the right, you'll find a Drone Pod with a guardian drone and a fair amount of loot, including power modules, several alien epoxies, biogels, the atomic pulverizer (a unique alien atomizer), along with a normal alien atomizer and a Buttercup toy. Once you reach the T-intersection, turn right. Follow the hallway to the second floor of the Weapons Lab. Go down the stairs and through the door in the middle. Once in another room, turn left and go upstairs. Go through the circular door and follow the room to the left. Go into the hallway to the northeast and up the stairs into the experimentation lab.
Once in the Lab, veer right into another room and go down the hallway before you. Follow the hallway until you reach a large room with a force field covering a door on the other side. Activate and destroy the power generator in the middle of the room to disable the force field. Head down the hallway and enter the biological research lab.
Head up the stairs on the opposite side of the room. Turn right and go across the bridge. You will find a shielded door and switch to the right. Go through the door and turn right. Walk straight across the platform to the teleporters. Note: once you use the teleporters to the Death Ray hub, you cannot go back until after the quest is over. If you're going for Alien Archivist achievement, make sure you have all the previous recordings. There should only be one more to get after this point if you've been doing it correctly.
Fight your way through the Death Ray Hub to the Death Ray control, where you'll face a room full of hostile aliens. Once they are defeated, press the button with the cylinder graphic above it four times, causing the four generators to rise. Repeat the same pattern to overload each one. After you destroy the second generator, another wave of several aliens will attack you. If you'd like, you can redirect the death ray from this room as well.
Once all four generators have been destroyed, the door across the way opens to the living quarters. You'll encounter portable shields here for the first time, which can be destroyed by several hits. Fight past turrets, aliens and the occasional abomination to reach your final destination: the teleporter to the Bridge.
Kill the alien captain
Note: Once you enter the Bridge, you are committed to finishing This Galaxy Ain't Big Enough... and will not be able to re-enter most areas of the ship. Be sure you've finished exploring Mothership Zeta to your satisfaction before entering the Bridge.
Once you arrive on the Bridge, your next objective is to kill the alien captain. The captain himself is fairly weak, but he does carry a powerful weapon, the Captain's sidearm, which fires multiple shots at once. There are also several other aliens in the room, armed with alien atomizers. Note that your allies (if any) may kill the alien captain without you. Once he is dead, a large holographic alien head will speak to you, but as always, it is impossible to understand. Once he's done talking, another alien ship passes by yours, and attacks the Mothership with its Death Ray.
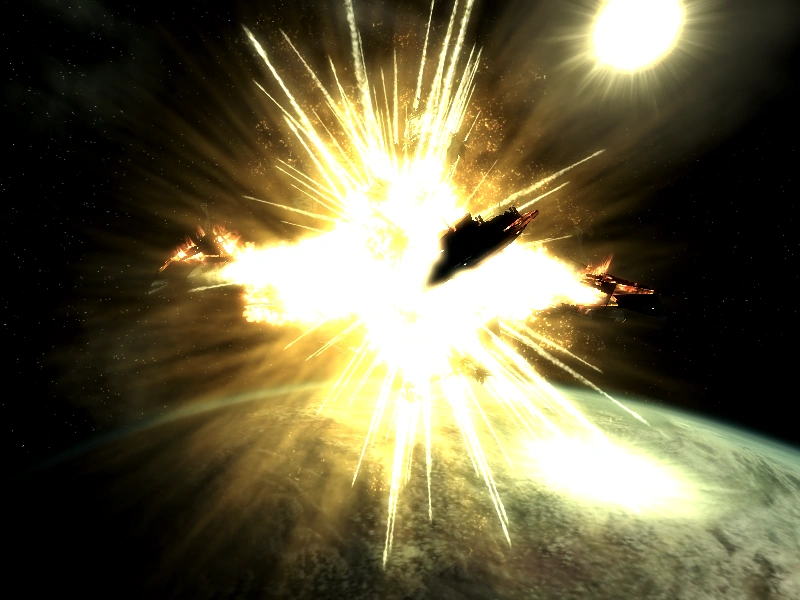
Destroy the attacking alien ship
Destruction of the other Mothership
Your allies (if they have survived) will come to the bridge. Sally remarks that the control room looks exactly like the one from Captain Cosmos, and that she knows exactly what to do. She orders everyone to take a specific position on the bridge. Paulson, however, is asked to "guard our backs" (specifically, Sally tells him he can be the space monkey to which he replies "I ain't no goddamned space monkey"); he remains in the area with the teleporter.
Now you must destroy the attacking alien ship. You can command your ship's Death Ray and Shields, and determine how the power in the ship should be divided between them:
Anti-Spoiler: Try to just 'wing-it' your first time through. 'Button-smashing' your way through this battle adds a comedic accent that seems to have been intended by the designers.
- Full Shields: Most of the ship's energy is routed to the defensive Shields, giving you extra protection but weakening your Death Ray. This is the leftmost button.
- Intermediate: The ship's energy is divided equally between the Shields and the Death Ray. This is the initial condition.
- Low Shields: The ship's energy goes mostly to the Death Ray, severely weakening your Shields but giving your Death Ray much more power. This is the rightmost button.
- Fire Death Ray: This is the fourth button, to the right of the three Shield buttons.
Occasionally a hit from the attacking ship will cause the ship's generators to go offline. You must reactivate them via the four buttons located on the east and west walls of the Bridge. While the generators are offline, Elliot will not be able to use the teleport jammer. This will result in aliens teleporting into your ship and attacking. If you want to make sure everyone survives, it is advised that you kill the aliens before going back to restarting the generators.
Once you damage the attacking ship halfway, Somah will say that the shields and Elliot are down (the shields will come back almost immediately, and Elliot just gets knocked to the floor when the panel explodes). At this point, the teleport jammer will no longer be active at all, and aliens will teleport into your ship more frequently whether the generators are online or not. Elliot will then head through the teleporter (it will lead to the engineering core after the battle so it can be assumed that it took him there, despite it currently leading to the Living Quarters). He will then return after the battle is over.


The remains
After the hostile ship has been destroyed and the fireworks have ended, speak with Sally to finish the quest. You may now use the still-accessible parts of the ship (mostly the Bridge, engineering core, and steamworks) as your own home.
After you leave the mothership, Somah and Paulson are removed from the game, and you can never see them again.
Reward
- 600 XP
- Captain's sidearm
Quest stages
Notes
- It is possible to fire the Death Ray at Earth. It creates a giant crater on the Earth's surface, but does not destroy the planet.
- Even though you destroyed the Death Ray's generators earlier, you are still able to use it against the attacking alien ship. Either this Death Ray is different from the main weapon; it seems to fire fully automatic bursts like an Anti-Aircraft Gun; or there may be a set of backup generators somewhere on the ship. It is even possible the ship has two Death Rays: one used in ship-to-ship combat, and another designed to strike planets, as in the Observation Room, Somah, Elliot, Paulson, or Sally (first in that list still alive at that point) asks the player to disable the Death Ray, to avoid the destruction of Earth.
- It's best to let the other ship take the first shot then retaliate, as they usually lower their shields to fire, but don't raise them for a few seconds. You can see the status of their power distribution over the fire controls.
- When you return to Earth, the original crashed ship is gone (replaced by a pile of trash and rubble) with a homing beacon in its place, as the ship is (or was) in Zeta's hangar. If you have not gotten them yet, the alien blaster and alien power cells will still be there.
- It's possible to sit in the Captain's Chair and operate the buttons from a seated position, so long as your aim for the buttons is good.
- If you watch the second mothership after you've destroyed it, it will eventually fall away from view and down to Earth, crashing at an unknown location. However, it is surrounded by fire as it starts to burn up in the atmosphere, so it is possible it has completely burned up before hitting the Earth, although from the size of it, this is unlikely.
- When the attacking ship fires at full power, it will knock your allies down and they will flop to the floor as if they were dead before getting back up and resuming their posts. It is possible to loot them at this moment without having to pickpocket. The prompt will still say "Talk [non-player character's name]" but their inventory will pop up instead. You will not lose any Karma from this. This also happens when they're shot after the quest. If the player first has Somah repair their worn-out equipment, and then shoots her, the caps in her inventory can be looted regardless of how many she has. This is an easy way of repairing equipment for free before Somah leaves the game.
- Sally reports that Paulson has returned to Earth, even though you never see him use the teleporter. If Paulson dies in the hangar, this will not occur.
Bugs
 If you still have the Picking Up The Trail quest active, sometimes it will be completed automatically for no reason while this quest is active, usually in conjunction with the auto-completion of this quest, see below. [verified]
- Similarly to the Rescue From Paradise main quest. This quest may randomly auto-complete up to the 'kill the captain' stage after activating the engineering core teleporter, causing Sally and the other non-player characters to port back into the engineering core and make a bee-line for a teleporter to the bridge located behind an inaccessible door. There is presently no simple fix for this. The easiest way to continue is not to activate the first teleporter. Then, use the no clip console command (tcl) to go through the doors Sally normally opens and then go to the weapons lab as normal. This way you can collect the alien captive logs and the Xenotech perk. Proceed onward until you get to the bridge, kill the aliens, then use the setstage command to complete the quest up to stage 40. Then, your companions will teleport to the bridge and you can complete the quest normally. You should get quest credit when the enemy alien ship blows up, even if all the quest objectives aren't shown as complete on your Pip-Boy. [verified]
- When entering the observation area, Sally sometimes will go to the large window in the middle of the room and stay there. Unable to talk with her, she'll stay there and won't open the door for you, making it impossible to continue. A way to fix this is to "push" her near the door, and she will unglitch and open the door. Alternatively, use the teleporter to travel back and then come back through it, causing an auto save, then load from this point. But if to no avail, walk up to the door, bring up the console (`) click the door and then type "unlock" which will unlock the door. [verified]
- Sometimes, after you have enjoyed the view of Earth, Sally should go to open another door. But instead of opening the door, she'll wait for you at the teleporter behind the "key locked" door. . Using the console command "unlock" on the PC will fix this problem. [verified]
- When trying to access the teleport to the death ray (that was the only one active out of the three, one of which is the bridge) it does nothing and when pressed a buzz noise is produced (as if it is inaccessible). The way to easily fix this is to make a save in the room with the teleporters, BEFORE you hit the activation switch, turn off your console, and load the save. [verified]
- When trying to access the teleport matrix in the room after the decompression chamber, the characters won't appear. This can be fixed by reinstalling the DLC, restarting your console, or restarting the game and loading a slightly earlier savegame. [verified]
| |||||||||||||||||||||||||||||||||||||||||||||||||||||